AUBE TH232 Underfloor Heating Programmer
The AUBE TH232 [Air / Floor / Air + Floor compatible] is a direct replacement for the AUBE TH132-F and AUBE TH132-AF. So, if you’re looking for an easy swap for your earlier thermostat of the mentioned models, the TH232 is one of the most hassle free options. This model can also be used to replace many other underfloor thermostats of different brands. AUBE is now part of the Honeywell brand. They are excellent thermostats that, once installed, offer a good selection of features and programming options for simple or diverse electric underfloor heating requirements.
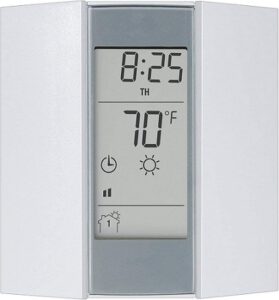

The digital display lights up when the control unit is activate via a button being pressed and remains lit for for approximately 12 seconds. This model is a good option for bridging the gap between older units and Smart units, such as HIVE, which can offer more than some people want or need. Can be used in auto or manual mode and has 7 day programming. Each day can have different settings or the same can be used for all days. It also has optimum / early start, override, comfort and economy modes. There are 4 heating periods which are presented by symbols on the screen.
Those are wake up / morning, nobody home, back at home and night / sleep time. These heating periods are easily adjustable to suit personal preferences. Can be changed from Celsius to Fahrenheit or vise versa, and can also use 12 or 24 hour time format. Whichever a user prefers. Take a look at the video below to learn how to use the unit and familiarize yourself with the controls.
Despite looking a little confusing because there are a lot of symbols on the screen, it’s actually really easy to use. If you want to see a more in depth look at how to use the TH232, watch the helpful video guide by Heatwell Ltd. There has been quite a few people asking the question of how to turn the unit on. To turn the unit on or off press and hold the power button, which is the third button down behind the door panel on the right side of the control unit in the video. The side that has 5 buttons instead of 6. Comes with sensor and has a 3 year guarantee.
If you are looking for the manual / set up instructions in PDF format it can be read / downloaded here.